Canjie - A Modern Personal Blogging System Based on Astro + Starlight — Elegant, Efficient, and Secure
System Features
Section titled “System Features”- Static Site Generation based on Astro, offering outstanding performance
- Using the Starlight theme, providing an elegant default design
- Complete blogging functionality, including post management, categories, tags, and more
- Great development experience, supporting TypeScript and hot reloading
- Focused on security and performance optimization
- Supports theme customization and responsive design
Framework Architecture and Theme
Section titled “Framework Architecture and Theme”This system is built on the Astro framework. Astro is a modern, high-performance website building framework that focuses on delivering lightning-fast load times and an excellent development experience for content-driven projects (such as documentation systems, knowledge bases, blogs, etc.). Through intelligent frontend optimization, it makes the system lightweight, fast, and easily extensible.
On top of Astro, this system uses Starlight as the core architecture for the documentation system. Starlight is a solution designed specifically for documentation projects, offering features such as sidebar navigation, full-text search, multi-language support, versioning, and more. This helps us quickly set up a complete documentation system, saving development time and providing great convenience for system expansion and maintenance.
To further improve the system’s visual performance and user experience, we chose the starlight-theme-flexoki theme. It is based on the Flexoki design system, providing a gentle, clean, and elegant color scheme and typography style, ensuring the system remains professional while also providing a friendly reading experience.
In summary, the technology stack of this system is as follows:
- Astro → Core framework, responsible for system construction and performance optimization
- Starlight → Documentation architecture, providing the main functional modules of the system
- starlight-theme-flexoki → Theme plugin, giving the system a unique and beautiful design
The goal of this combination is to create a high-performance, feature-complete, and user-friendly system that offers an efficient and smooth user experience.
Plugins
Section titled “Plugins”To make the system more powerful, user-friendly, and expressive, it integrates the following four carefully selected plugins, each empowering the system in different ways:
- Starlight Blog Official website: Starlight Blog Introduces blogging functionality to the Starlight system, expanding it into a content creation and sharing platform.
- Starlight Image Zoom Official website: Starlight Image Zoom Provides elegant image zoom functionality for documentation and blog pages.
- Expressive Code Official website: Expressive Code A plugin focusing on syntax highlighting and code presentation optimization.
- Starlight Giscus Official website: Starlight Giscus Adds comment and discussion features to the system, based on GitHub Discussions, via Giscus.
Bug Fixes and New Features
Section titled “Bug Fixes and New Features”- Fixed issue where tags with uppercase letters (English) would return a 404 error when clicking the tags link.
- Fixed conflict when both Starlight Blog and Starlight Image Zoom plugins are imported simultaneously.
- Added external link forwarding functionality.
- Changed the theme switcher from a dropdown menu to a direct-click interaction.
- Added a custom 404 page.
- Added line numbers to code blocks.
- Added an archives page.
- Added a categories page.
- Added a “Back to Top” button.
Project Structure
Section titled “Project Structure”- astro.config.mjs
- package.json
Directorysrc/
Directorycomponents/
- BlogArchive.astro
- CategoryList.astro
- ExternalLinkRedirect.astro
- Footer.astro
- Head.astro
- HomePage.astro
- MarkdownContent.astro
- Page.astro
- PageTitle.astro
- ThemeSelect.astro
Directorycontent/
Directorydocs/
Directoryblog/
- …
Directorycategories/
- index.mdx
- 404.mdx
- archives.mdx
- index.mdx
- link.mdx
Directorypage/
- index.mdx
Directorypages/
Directoryapi/
- redirect.js
Directoryscripts/
- generate-pagination.js
- content.config.ts
Features
Section titled “Features”Content Display
Section titled “Content Display”- Responsive design
- Post categories, archives, tags, sticky posts, recommended posts
Reading Experience
Section titled “Reading Experience”- Code highlighting
- Image optimization and zoom
- Theme switching, smooth scrolling, “Back to Top”
Interactive Features
Section titled “Interactive Features”- Comment system (Giscus)
- External link forwarding, pagination, search
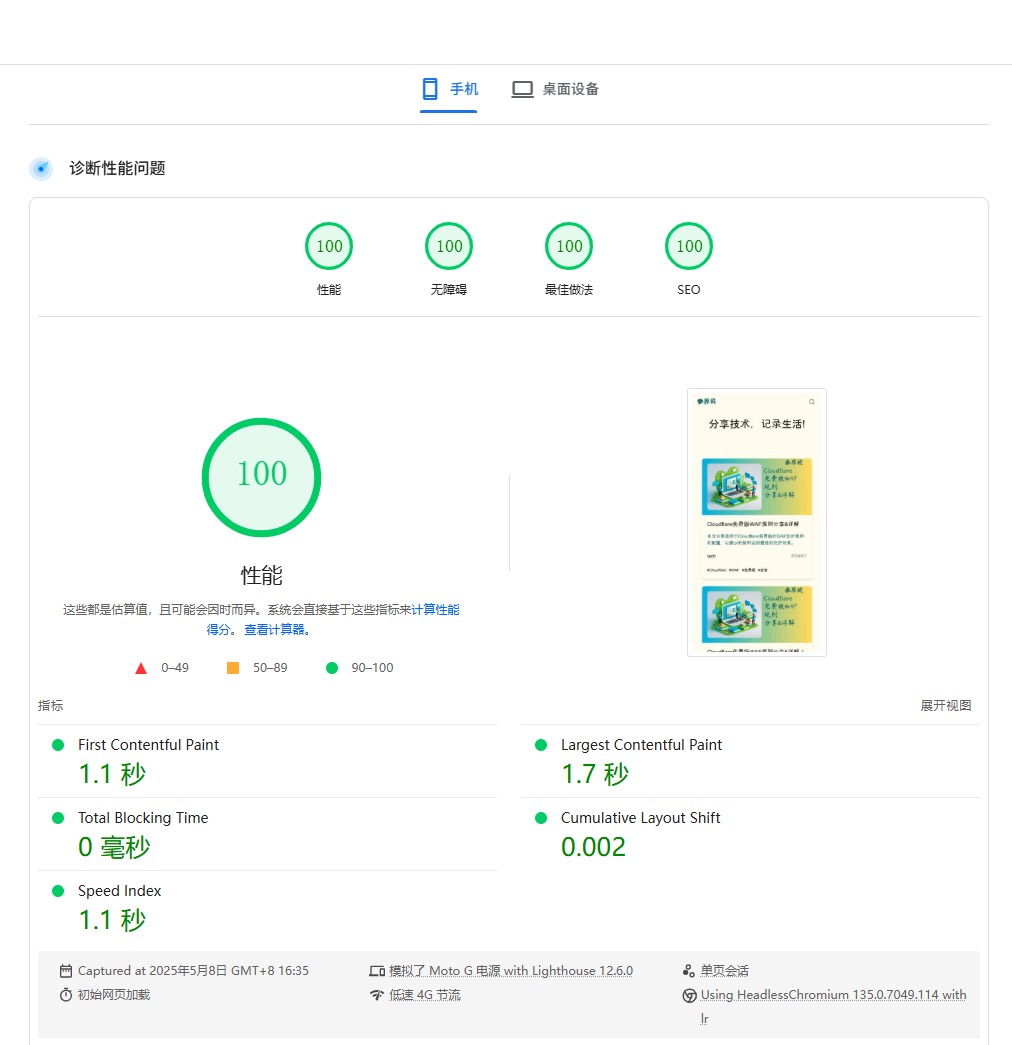
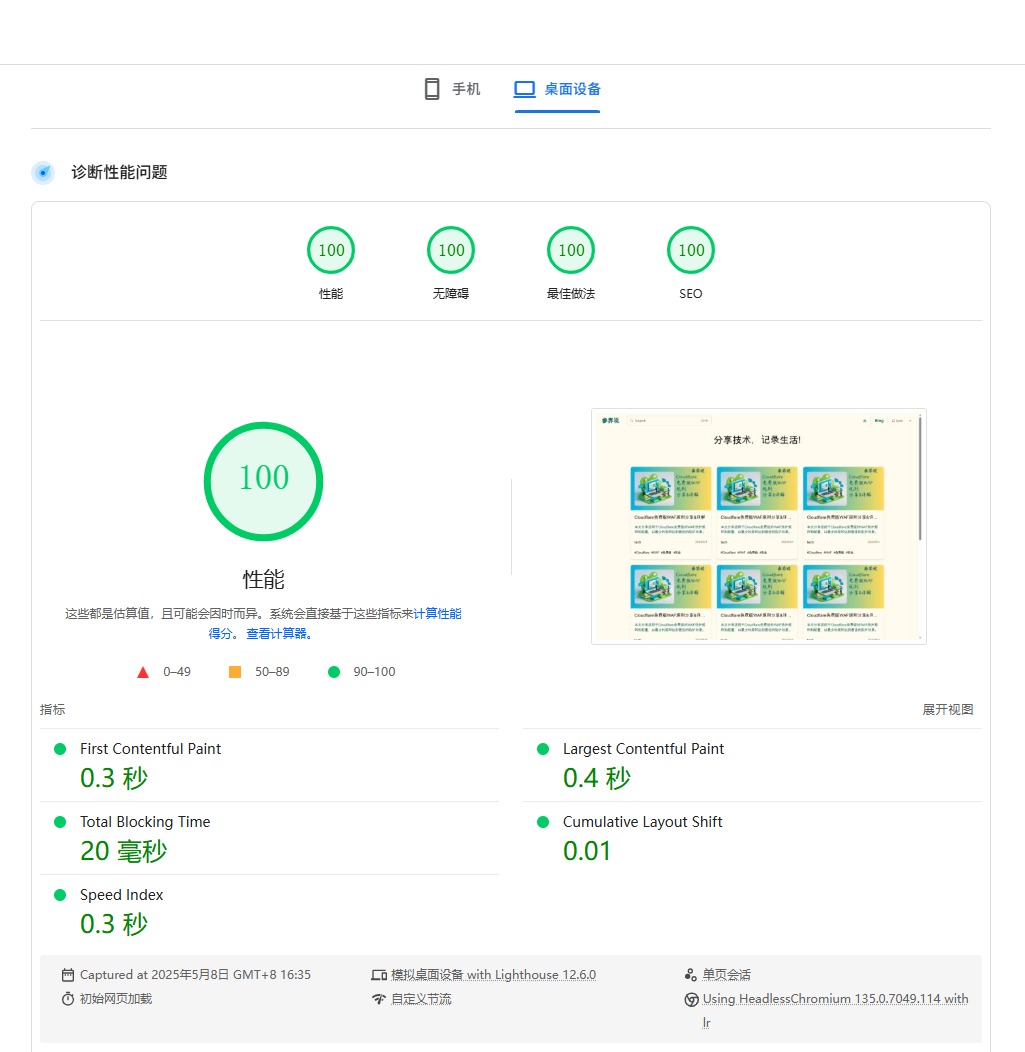
Performance Optimization
Section titled “Performance Optimization”- Static generation, on-demand loading, image optimization, caching strategies
SEO Optimization
Section titled “SEO Optimization”- Sitemap, Meta tags, canonical links, structured data
Security Features
Section titled “Security Features”- External link protection, XSS protection, CSP support
Development Experience
Section titled “Development Experience”- Component-based, hot reloading, TypeScript support, build optimizations
Special Features
Section titled “Special Features”- Runtime stats, article statistics, custom 404 page, theme customization, responsive layout
Tech Stack
Section titled “Tech Stack”- Astro + Starlight / Vite / CSS Modules / MDX
Platform Deployment
Section titled “Platform Deployment”Before you begin deployment, make sure you have both Cloudflare and GitHub accounts.
-
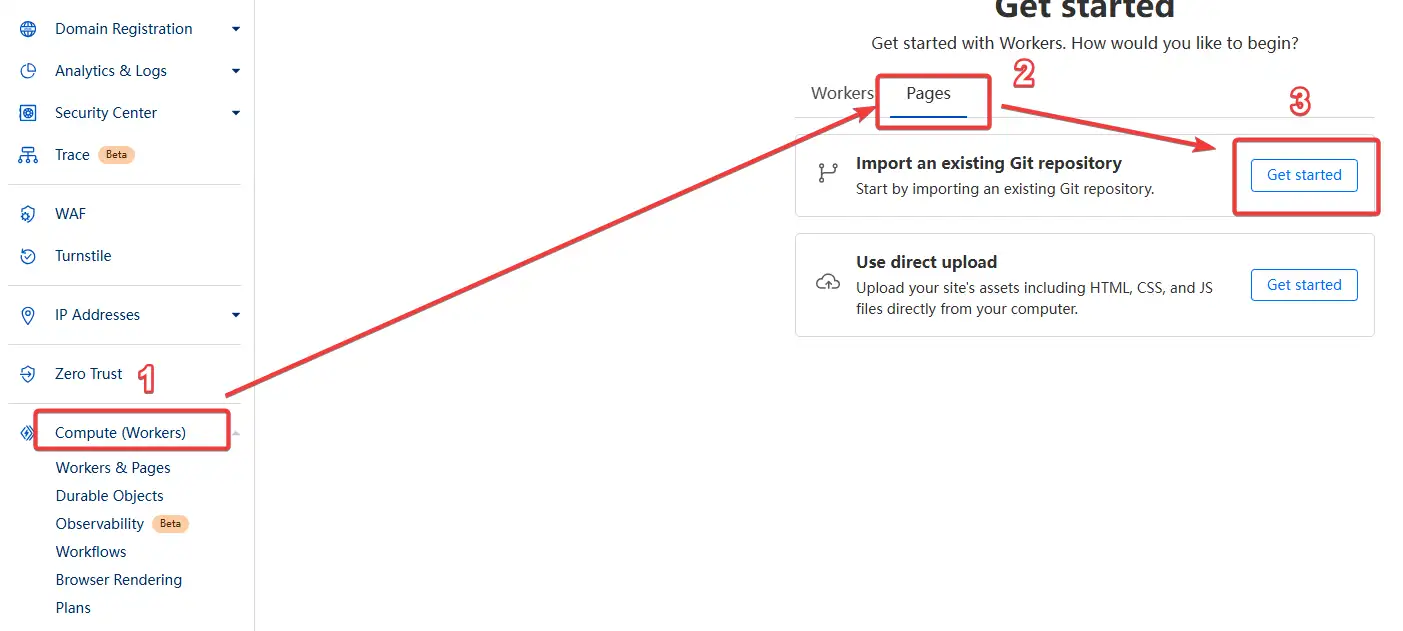
Log in to the Cloudflare Dashboard, click Compute > Workers on the left, then on the right click Pages, and click Get Started next to “Import an existing Git repository”.
-
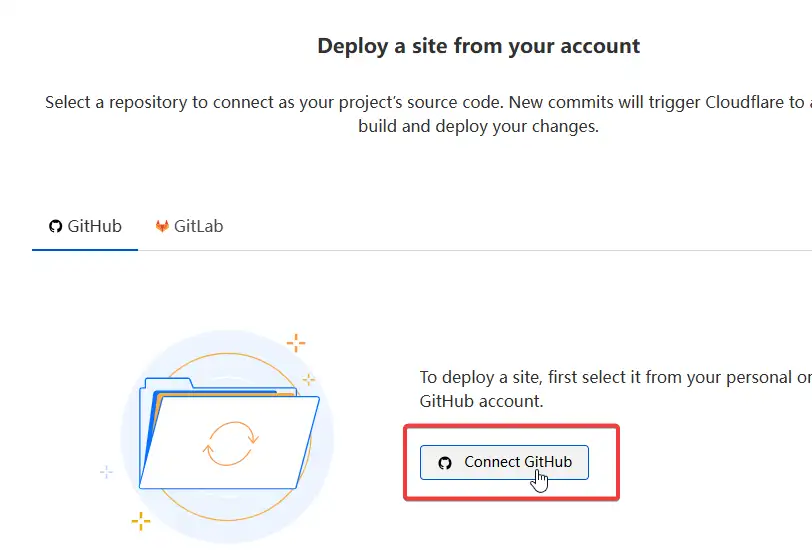
In the popup, click Connect GitHub.
-
If you’re not logged in to GitHub yet, complete the login process first.
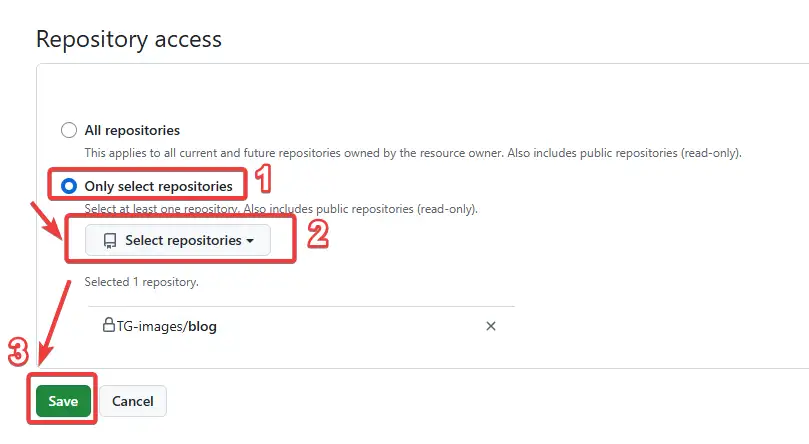
After logging in, on the authorization screen, find Repository access, choose Only select repositories, click Select repositories, check the repo you just forked, and click Save. Once authorized, you’ll be automatically redirected back to Cloudflare.
-
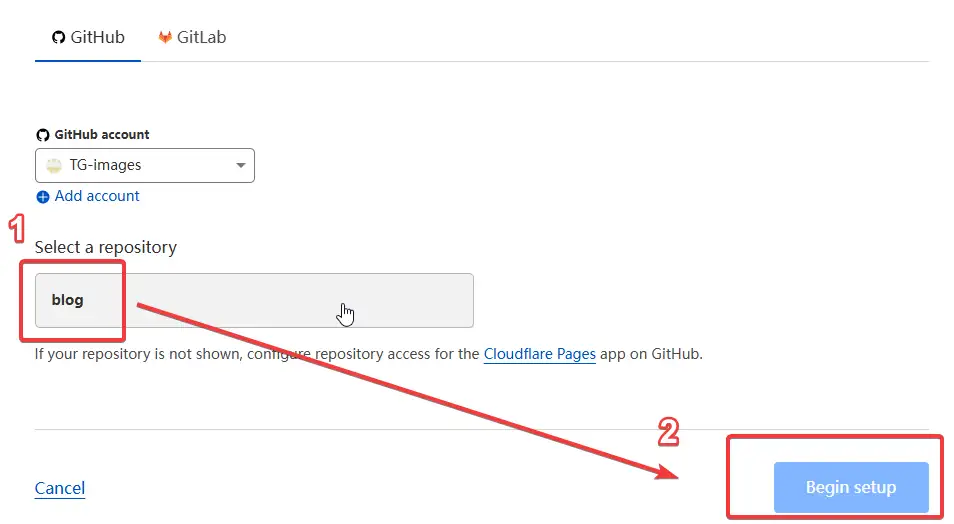
Back in Cloudflare, under “Select a repository”, choose the newly authorized repo and click the enabled Begin setup.
-
Configure the build settings:
- Project name: Any project name you prefer
- Build command:
npm run build - Build output directory:
dist
Then click Save and Deploy. Cloudflare will automatically build and deploy your project.

Cloudflare Demo
- Fork this repository
- GitHub authorization is the same as with Cloudflare
- In your Netlify project Build settings, enter the following:
- Build command:
npm run build - Publish directory:
dist - Then click to build and deploy
- Build command:
Netlify Demo
- Fork this repository
- GitHub authorization is the same as with Cloudflare
- In your Vercel project’s Build and Output Settings, enter:
- Build Command:
npm run build - Output Directory:
dist - Save and start the deployment
- Build Command:
Vercel Demo
Self-Hosting Guide
Section titled “Self-Hosting Guide”npm create astro@latest -- --template canjieorg/canjie blog && cd blog && npm installnpm run devnpm run buildpnpm create astro@latest -- --template canjieorg/canjie blog && cd blog && pnpm installpnpm devpnpm buildyarn create astro --template canjieorg/canjie blog && cd blog && yarn installyarn devyarn buildProject Setup
Section titled “Project Setup”After the project has been deployed, you need to complete the following two steps before you can start enjoying writing your blog:
- Modify System Parameters (Required)
To customize the system parameters according to your preferences, you can refer to this guide
- Set Up the Comment System (Optional)
This blog system has a built-in giscu comment component. By default, comments are disabled on all pages.
If you want to enable the comment feature, you can refer to this guide.
If you do not intend to enable comments, you can ignore this step.